
How to set up an image-based email signature on Gmail – Step by step tutorial with images
Whenever I create an image-based email signature for any of my clients, the next natural question is always “How do I set it up on my email account?”. After a pretty long time offering this service, I can say most small business owners I’ve worked with manage their emails through Gmail. That’s why I have decided to create this quick tutorial in 5 easy steps including images for reference. Other email services may have a different interface but I’m sure the process is very similar. I hope you find it useful!
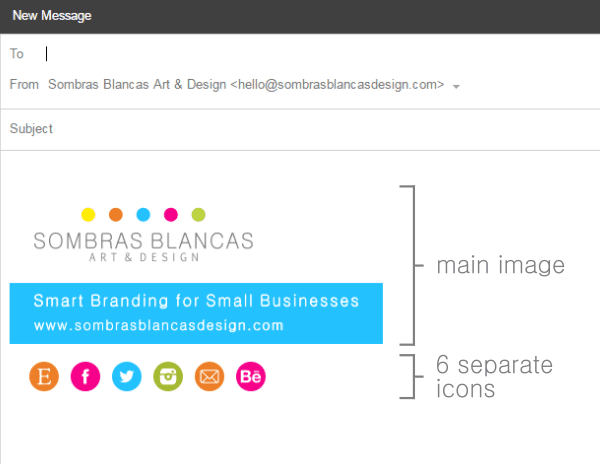
Step 1. Prepare your images
The first thing you need is obviously your signature images. Your email signature can include one or several images. What you need to keep in mind is you can only link each image to a single URL, so in case you want to include your social media profiles or other links, you will need separate images for that. As you can see on my own signature on the image below, I have a larger image for my logo, tagline and website, and then 6 separate icons for social media, newsletter, etc. The main image is linked to my website and each icon is linked to its corresponding URL.
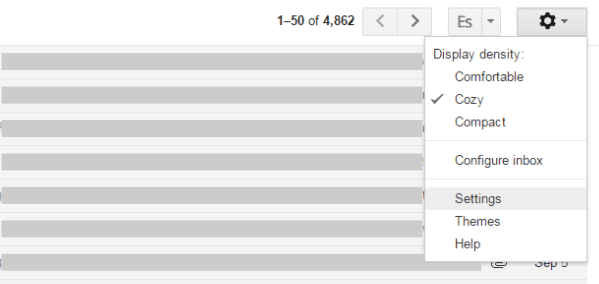
Step 2. Go to the Signature section on the Gmail settings menu
On your Gmail account, click on the gear icon you see on the upper right corner and then on Settings.
Then, inside the General tab that appears by default, scroll down until you find the Signature section. Here is where you will compose the signature that will appear at the end of your emails. Select the second option on the upper radio buttons (your email address). In case you manage different email addresses from your Gmail account, you will need to select one from the dropdown. This gives you the ability to create different signatures for different addresses. In case you want the same signature for all your addresses, you just need to copy and paste the signature content on all the different addresses from the dropdown menu once you have finished creating your signature.

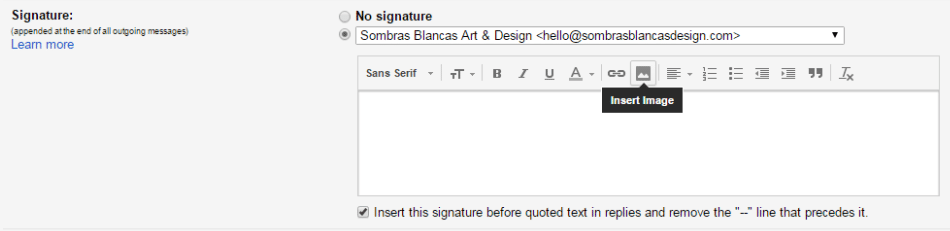
Step 3. Insert your images
If you click on the Insert Image icon (image below), a new box will pop up. Here you will find 3 different options to insert your images:
- My Drive: if you use Google Drive and you previously stored your signature images there, you will be able to select them from this tab.
- Upload: if you want to upload your images directly from your device.
- Web Address (URL): if you prefer to upload your images to any cloud storage service and use the URLs instead. If that’s the case, I recommend you to use Photobucket.
As far as formatting your signature, the editor works very much like any simple word processor so you will be able to place images in different lines, align them and even insert text above or below your images.
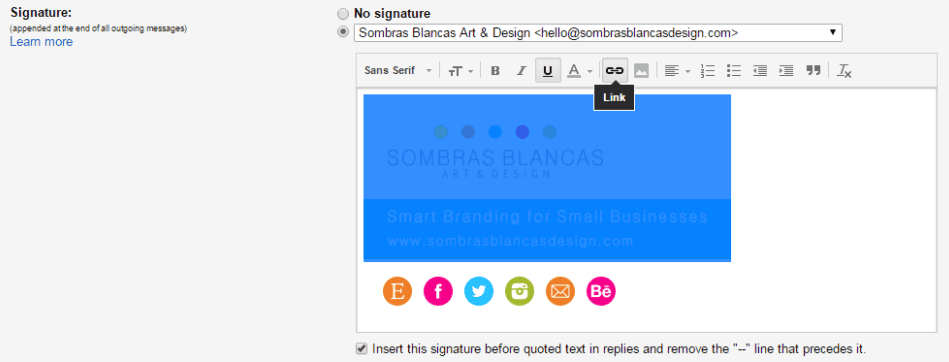
Step 4. Link your images
Once you have all your images in place, it is time to make each one point to the correct URL. In order to do that, select one of your images and then click on the Link icon (image below). A new box will pop up where you will be able to type in the URL you want the image to be linked to. You need to repeat the process for each one of your images.
Step 5. Save your signature
Now that you have all your images linked, don’t forget to save your signature! Scroll all the way down to the bottom of the General tab and click on Save Changes.
And voilà! Your new email signature is ready to be used. If you now open a new message, you will see your signature is already there. It is a very easy solution to display your info and links professionally on all your emails, keeping them in line with your brand’s look.
If you find this useful, please, don’t forget to share :)
Get a free brand consultation
Do you have a brand already?
I can help you figure out its strengths and weaknesses and give you some tips on how to improve its online presence.
Are you thinking about starting your brand or redesigning your current one?
We can discuss some ideas, plan the next steps, and solve any questions you may have.
Fill in this form and I will get back to you in 1-2 business days with lots of useful info tailored to your business.
No Comments
Sorry, the comment form is closed at this time.